
Description
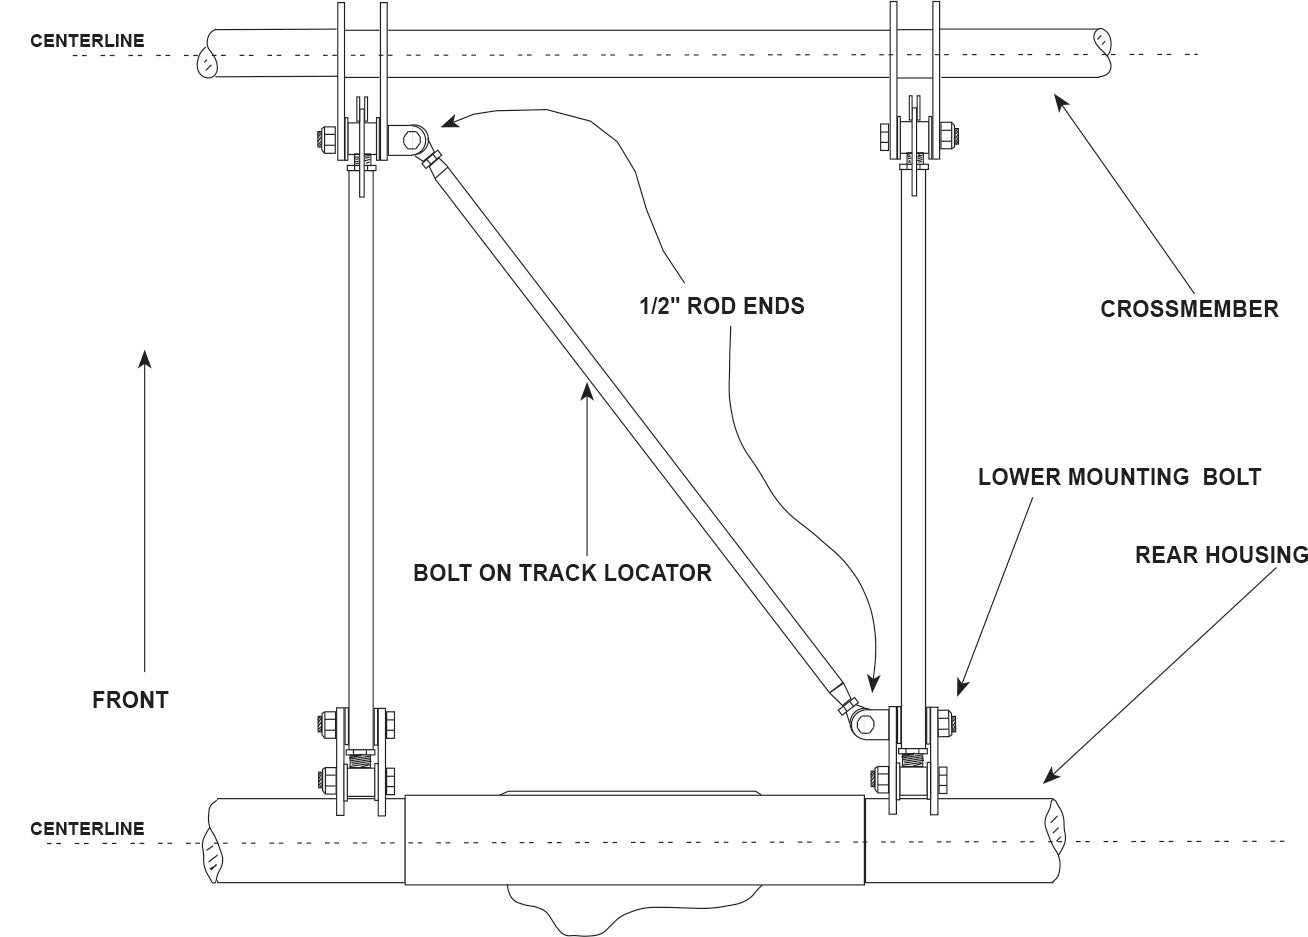
Bolt on Track Locator Bar Kit
- Length: 36"
- 7/8″ x .065 4130 Chromoly Steel Tubing
- Weld-in Tube Ends and 1/2″ Standard FK Rod Ends
- Brackets have 5/8″ Mounting Hole for Ladder Bars or 4-Link Applications with 5/8″ Suspension Bolts Front Rear
- All Hardware Included
TIG Welding Required

Bill of Materials
| Item | Qty |
Part Number |
Description |
| 1 |
1 |
875X065CMX36 |
Track Locator Tube |
| 2 |
1 |
63-090 |
Threaded Tube End - RH |
| 3 |
1 |
63-091 |
Threaded Tube End - LH |
| 4 |
2 |
60-481 |
5/8" Bolt On Track Locator Mounting Bracket |
| 5 |
1 |
64-108 |
1/2" RHM STD Rod End |
| 6 |
1 |
65-116 |
1/2" Fine RH Jam Nut |
| 7 |
2 |
65-135 |
1/2" Fine Nylock Nut |
| 8 |
2 |
65-048 |
1/2" x 2-1/4" G8 Fine Bolt |
| 9 |
4 |
63-074 |
1/2" Half Moon |
| 10 |
1 |
64-308 |
1/2" LHM STD Rod End |
| 11 |
1 |
65-117 |
1/2" Fine LH Jam Nut |
Installation Instructions
This kit contains 4130 chromoly steel tubing which will require the use of a TIG (heliarc) welder for proper installation.
1. Level the car from front to back and side to side.
2. Position the rear housing in the car at ride height with the ladder bars or 4-link installed, and the rear housing centered from side to side.
3. Install 1 "U" shaped bracket to the bottom, right rear 4-link or ladder bar bolt and 1 "U" shaped bracket to the bottom left front 4-link or ladder bar bolt. When correctly installed the remaining bolt holes should be on the top & bottm of the installed bracket.
4. Tack weld one of the threaded tube ends into one end of the track locator bar tube. Install one rod end with a jam nut into the tube end.
See Notes #1, #2, #3 and #4
5. Using enclosed hardware and two misalignment bushings (half moons) bolt the rod end into one of the brackets installed in step 3. The round side of the half moon goes towards the ball of the rod end.
6. Install the second rod end and jam nut into the remaining tube end. See tech notes #1 and #4. Use the remaining hardware and half moons to bolt this assembly to the remaining bracket.
7. Hold the track bar bar tube up to the second rod end assembly and mark the tube for length.
8. Disassemble both rod ends, cut the main tube to length and tack weld the second threaded tube end into the main tube.
See Notes #2 and #3
9. Re-install the assembled track bar with rod ends onto the mounting brackets.
10. With the driveshaft installed, move the rear suspension up and down , through it’s travel. Check all clearances, including tire clearance. Final adjustments can be made by turning the bar to shorten or lengthen it’s effective length.
11. When you are sure all clearances are correct, disassemble the track bar and finish weld. Do not grind the finished welds this could lead to premature failure of the track bar assembly.
12. Reassemble the track bar and install into the car. Adjust the track bar and tighten all mounting hardware.
Notes
1. When complete no more than 6 threads should be showing between the jam nut and the body of the rod end.
2. DO NOT weld tube ends with rod ends installed.
3. After welding tube ends, it may be necessary to run a tap through the tube ends. This kit contains one left hand & one right hand threaded tube end. Care should be taken to avoid
thread damage caused by mixing of parts.
4. This kit contains one left hand & one right hand threaded tube end, rod end and jam nut. Care should be taken to avoid thread damage caused by mixing of parts.
Specifications
| For Make | |
|---|---|
| For Model | |
| For Year |
You may also like
Recently viewed
S&W Performance Group
Did you find what you are looking for? If you have any questions get in touch.